How to Install Kubernetes Cluster with kubeadm on AWS Lightsail Instance
Intro
AWS Lightsail, kubeadm을 이용한 Kubernetes Cluster를 구축해본다. Node 설정 및 kubeadm 사용 방법은 AWS Lightsail을 이용하지 않는 방법에도 응용 될 수 있다.
Cluster Info
- Cluster Node 구성: 3 Lightsail Instances
- Master Node
- Worker Node1
- Worker Node2
- Instance OS: Ubuntu 20.04 LTS
- Kubernetes Version: v1.20.1
- CNI: Flannel
- Container Runtime: Docker v19.3.11
Prepare AWS Lightsail Instances
EC2에 비해 저렴하게 VM Instance를 사용할 수 있는 Lightsail Instance를 생성해 Kubernetes Cluster를 위한 Node로 활용한다.
Create Lightsail Instance
-
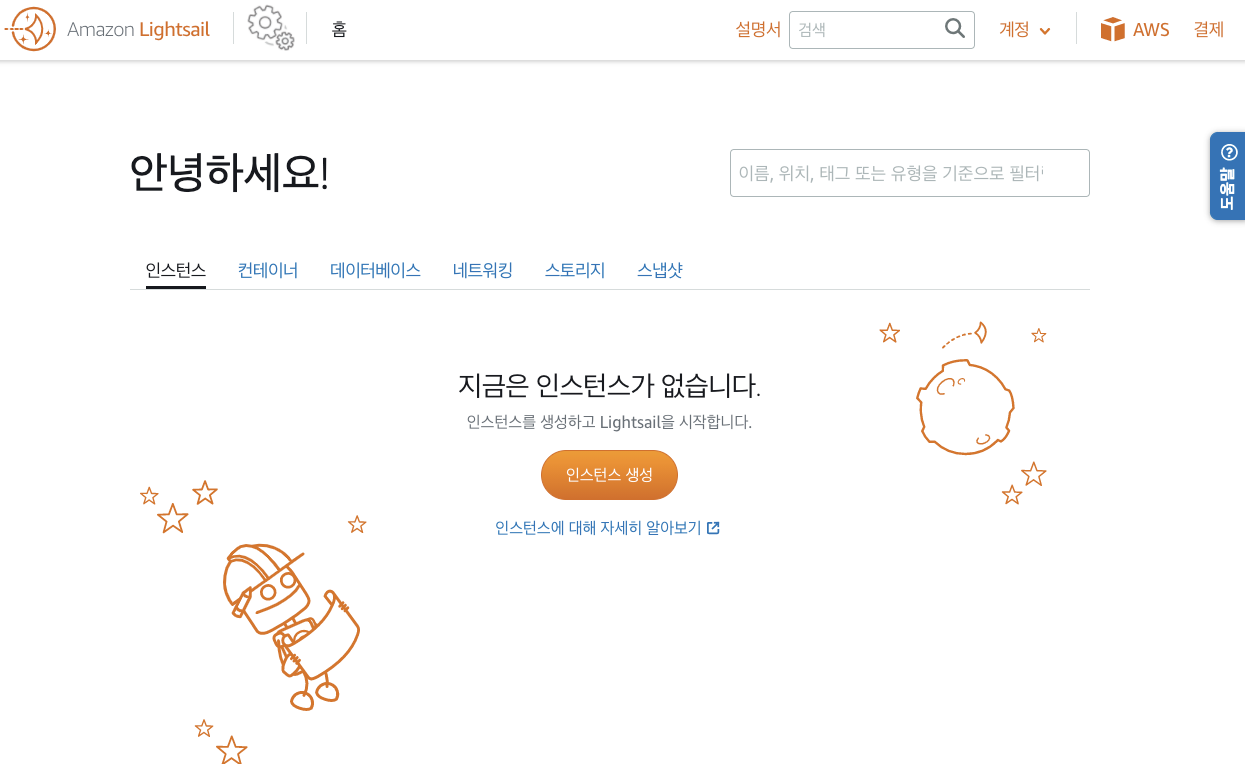
AWS에 Login 후 Lightsail Home 에서 인스턴스 생성 버튼을 눌러 생성 페이지로 이동한다.
-
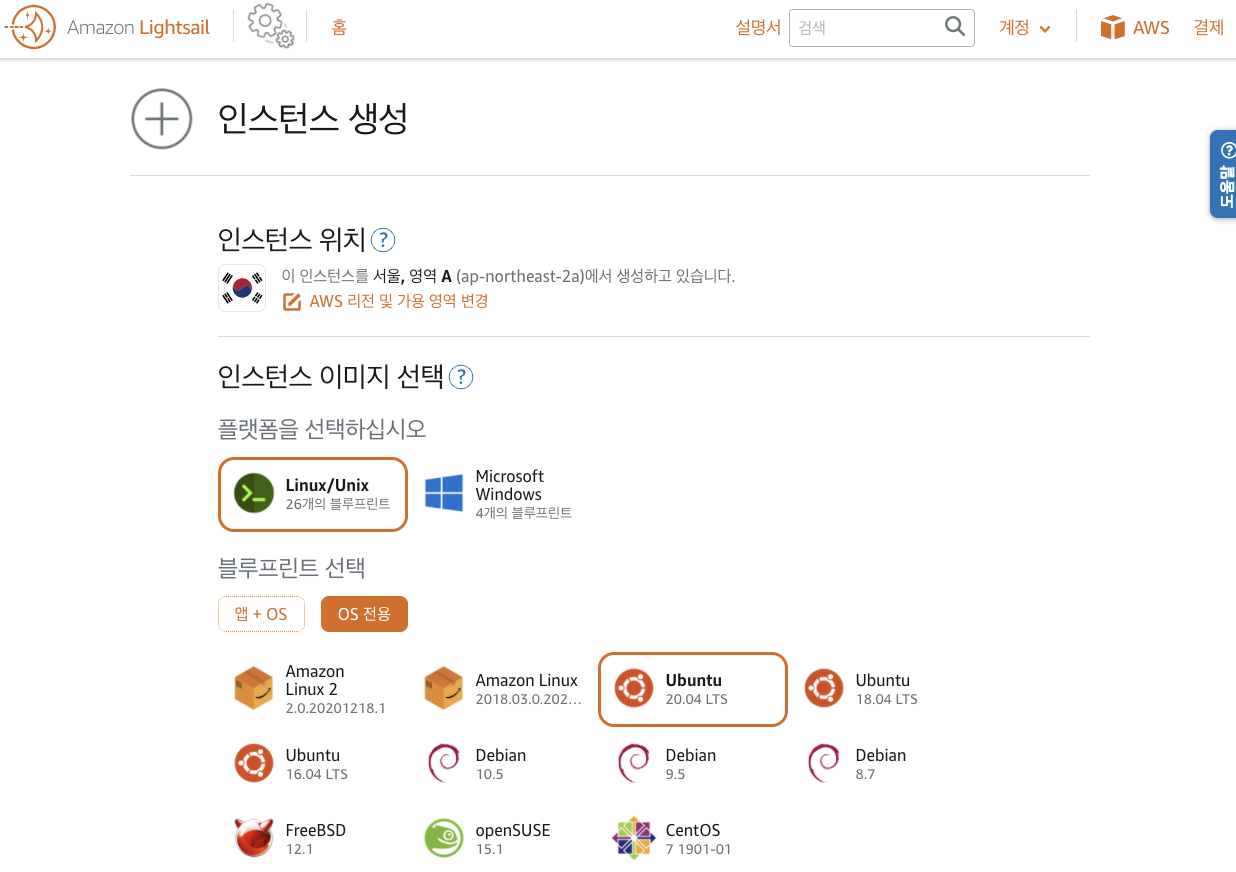
리전과 OS를 선택한다.
- Instance Plan을 선택한다.
- Kubernetes Cluster 구축 시 2CPU 이상과 2GB RAM 사용량을 권장하고 있다.
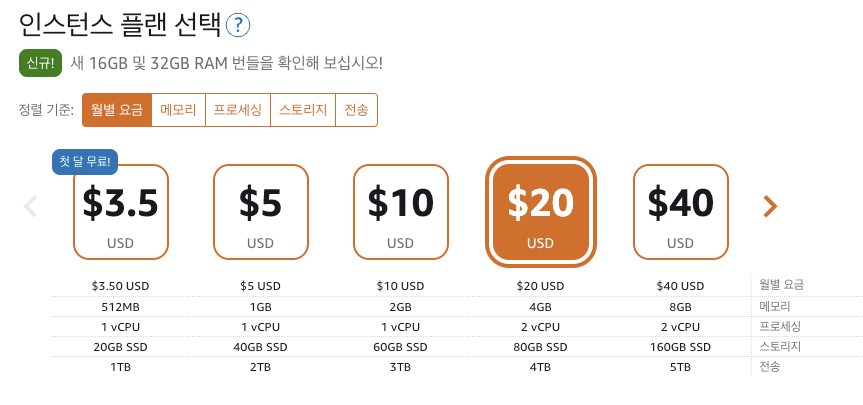
- Kubernetes Cluster 구축 시 2CPU 이상과 2GB RAM 사용량을 권장하고 있다.
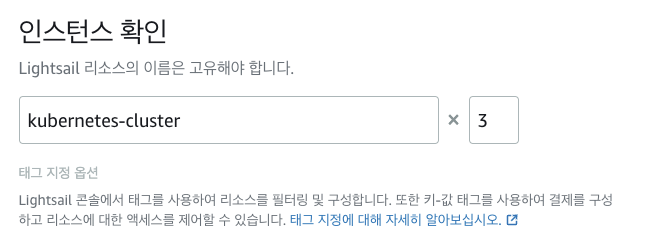
- Instance 리소스 이름과 생성할 Instance 개수를 입력한다. 한번에 여러개의 Instance를 생성 할 수 있다.
-
인스턴스 생성 버튼을 눌러 생성절차를 완료한다.
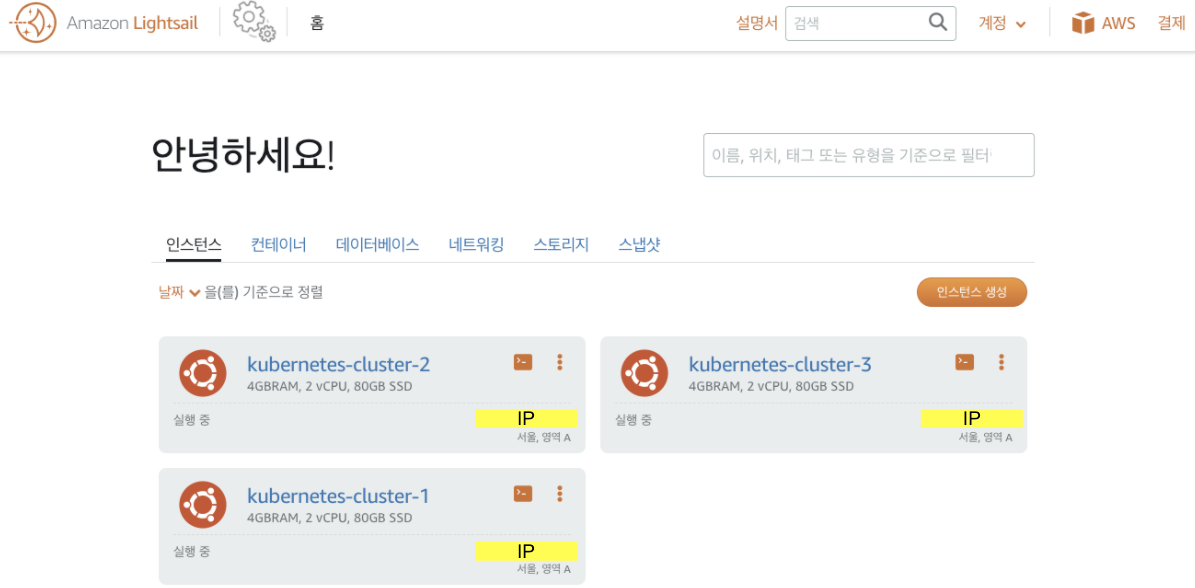
- Lightsail Home에서 생성된 Instance를 확인 할 수 있다.
Instance Basic Settings for All Nodes
각각의 Instance에는 Console 혹은 SSH로 접속하여 접근할 수 있다.
Setting Fixed Public IP
- 고정 IP 설정
- Instance 이름을 누른 후, 네트워킹 탭에서 고정 IP 생성 버튼을 눌러 Public IP를 고정해 준다. 이후 Instance가 재시작되서 IP가 변경 되더라도, Public IP는 고정된다.
Lightsail Home-네트워킹 탭에서 고정 IP를 생성하고, 동시에 Insatnce에 붙일 수 있다.
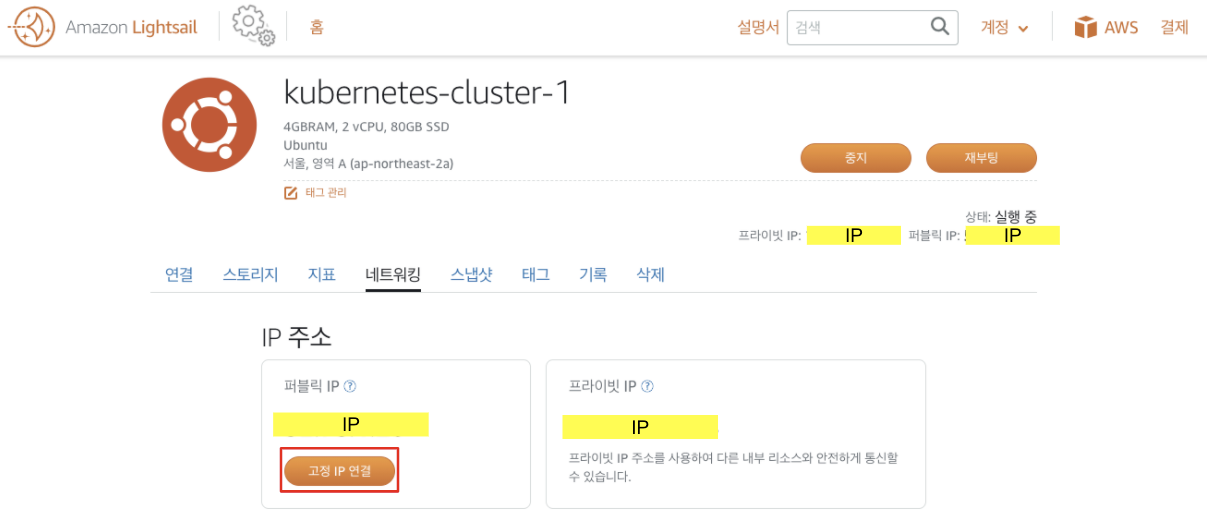
- Instance 이름을 누른 후, 네트워킹 탭에서 고정 IP 생성 버튼을 눌러 Public IP를 고정해 준다. 이후 Instance가 재시작되서 IP가 변경 되더라도, Public IP는 고정된다.
- 고정 IP 생성
- 고정 IP를 생성 후 Instance에 붙이거나, 동시에 Instance에 연결 시킬 수 있다.
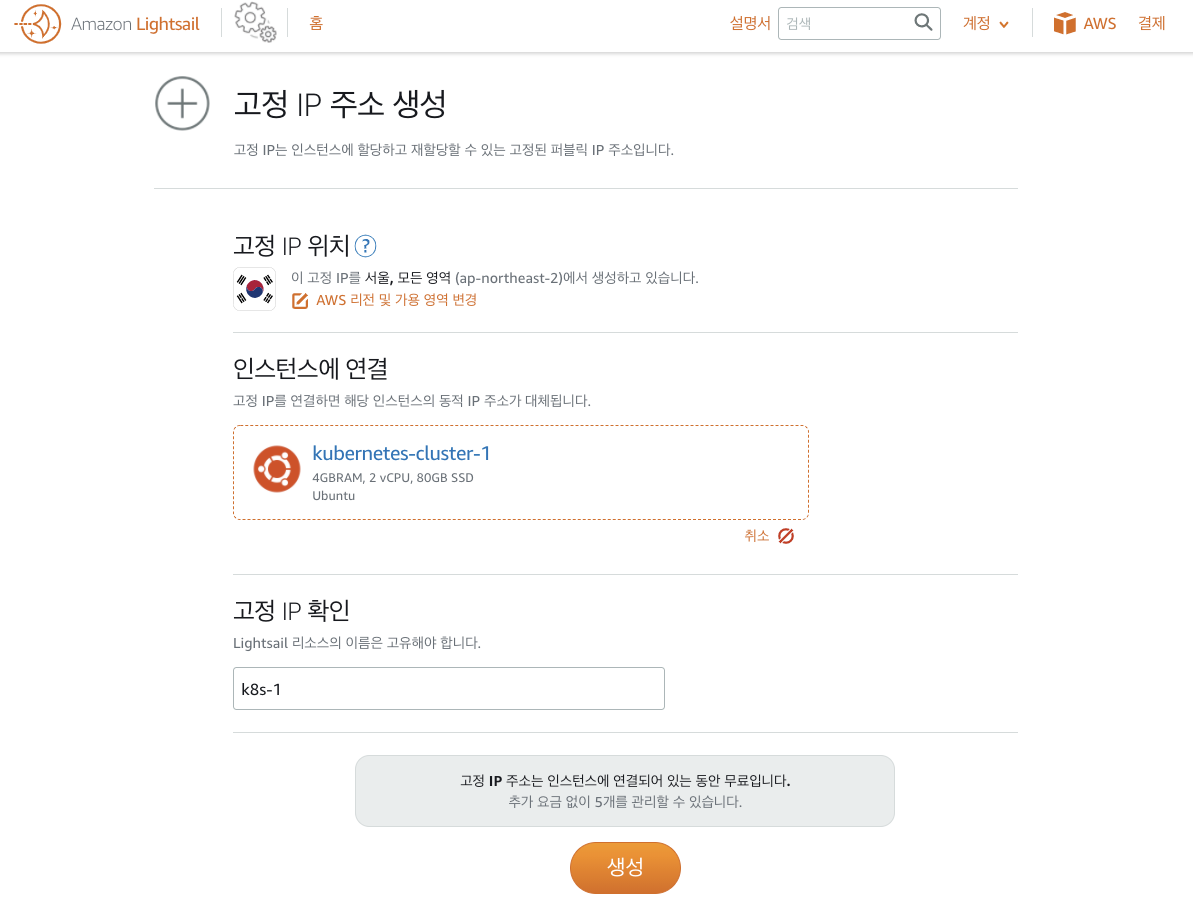
- 고정 IP를 생성 후 Instance에 붙이거나, 동시에 Instance에 연결 시킬 수 있다.
Timezone Setting
Instance에 설정된 기본 Timezone은 UTC이다. 필요에 따라 한국의 timezone으로 변경한다.
Instance 들에서 아래의 명령을 통해 기존의 Timezone을 제거 한 후, Asia/Seoul의 Timezone을 /etc/localtime에 링크해 준다. date 명령을 통해 KST로 바뀐 timezone을 확인 할 수 있다.
sudo rm /etc/localtime
sudo ln -s /usr/share/zoneinfo/Asia/Seoul /etc/localtime

# check Timezone
date
Change Hostname
Instance를 생성하면 IP를 기반으로 hostname이 설정되어 있다. hostnamectl을 이용해 hostname을 바꾸어 명시적으로 Insatnce를 사용 할 수 있다. Instance 재부팅을 하여 적용을 완료한다.
sudo hostnamectl set-hostname master
sudo hostnamectl set-hostname worker1
sudo hostnamectl set-hostname worker2

sudo reboot now
Install Kubernetes Cluster with kubeadm
kubeadm을 이용한 Cluster 구축 문서를 참고할 수 있다.
Disabling Swap
Kubernetes에서 QoS는 Swap을 사용하지 않는 것을 가정한다. Lightsail Instance에서는 기본적으로 사용하지 않고 있다. 만약 사용하는 환경의 경우, swap 설정을 off한다.
sudo swapoff -a # swap off

sudo vi /etc/fstab # 해당 파일에서 swap 부분 주석 처리 후 저장
Letting iptables see bridged traffic for All Nodes
필요한 kernel module을 로드하고, 설정을 변경한다.
# load kernel module
modprobe br_netfilter

# check if the kernel module has been loaded
lsmod | grep br_netfilter

# allow that iptables can see bridged traffic
cat <<EOF | sudo tee /etc/sysctl.d/k8s.conf
net.bridge.bridge-nf-call-ip6tables = 1
net.bridge.bridge-nf-call-iptables = 1
EOF
sudo sysctl --system
Firewall Setting
각 Instance의 네트워킹 탭에서, Cluster에서 사용하는 Port들을 Firewall에서 허용해 준다. 또한, 본인이 설치할 CNI별로 필요한 Port를 추가 허용 해야한다.
- Cluster에서 사용하는 Port 정보: 링크
- Flannel: UDP 8285, 8472 Port 허용필요. Flannel Firewalls 설정 문서
- Calico: Calico Port 정보 문서
Cluster 내부에서만 허용 되도록 IP 제한을 둘 수 있으며, Master 다중화 구성 혹은 Master Node를 Worker Node 겸용으로 사용할 경우 등의 경우에 상황에 맞게 Port들을 허용해 준다.
Lightsail이 아닌 개인 환경 등에서 테스트 하는 경우, 해당 Port들의 연결을 확인해 준다.
- 포트 설정 예시
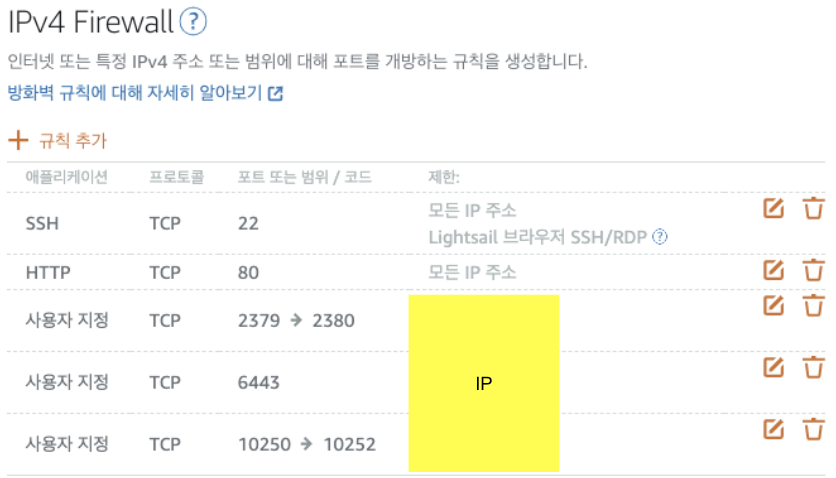
Installing Container Runtime for All Nodes
Docker, CRI-O, containerd등의 Container Runtime 중, 원하는 Container Runtime을 설치해 준다. [Container Runtime별 설치 가이드]를 참고한다.
Install Docker
모든 Node들에 Docker를 설치해 준다.
# (Install Docker CE)
## Set up the repository:
### Install packages to allow apt to use a repository over HTTPS
sudo apt-get update && sudo apt-get install -y \
  apt-transport-https ca-certificates curl software-properties-common gnupg2

# Add Docker's official GPG key:
curl -fsSL https://download.docker.com/linux/ubuntu/gpg | sudo apt-key --keyring /etc/apt/trusted.gpg.d/docker.gpg add -

# Add the Docker apt repository:
sudo add-apt-repository \
  "deb [arch=amd64] https://download.docker.com/linux/ubuntu \
  $(lsb_release -cs) \
  stable"

# Install Docker CE
sudo apt-get update && sudo apt-get install -y \
  containerd.io=1.2.13-2 \
  docker-ce=5:19.03.11~3-0~ubuntu-$(lsb_release -cs) \
  docker-ce-cli=5:19.03.11~3-0~ubuntu-$(lsb_release -cs)

# Set up the Docker daemon
cat <<EOF | sudo tee /etc/docker/daemon.json
{
  "exec-opts": ["native.cgroupdriver=systemd"],
  "log-driver": "json-file",
  "log-opts": {
    "max-size": "100m"
  },
  "storage-driver": "overlay2"
}
EOF

# Create /etc/systemd/system/docker.service.d
sudo mkdir -p /etc/systemd/system/docker.service.d

# Restart Docker
sudo systemctl daemon-reload
sudo systemctl restart docker

# If you want the docker service to start on boot, run the following command
sudo systemctl enable docker
Installing kubeadm, kubelet and kubectl for All Nodes
kubeadm, kubelet, kubectl을 설치해 준다.
sudo apt-get update && sudo apt-get install -y apt-transport-https curl
curl -s https://packages.cloud.google.com/apt/doc/apt-key.gpg | sudo apt-key add -

cat <<EOF | sudo tee /etc/apt/sources.list.d/kubernetes.list
deb https://apt.kubernetes.io/ kubernetes-xenial main
EOF

sudo apt-get update
sudo apt-get install -y kubelet kubeadm kubectl
sudo apt-mark hold kubelet kubeadm kubectl
특정버전의 kubeadm, kubelet, kubectl를 설치하고 싶은 경우
apt-cache madison 명령으로 설치 가능한 kubeadm, kubelet, kubectl 버전들을 확인 할 수 있다.
apt update
apt-cache madison kubeadm
apt-cache madison kubelet
apt-cache madison kubectl
# find the latest 1.xx version in the list
# it should look like 1.xx.y-00, where y is the latest patch

kubeadm, kubelet, kubectl 설치 시, 찾은 버전명을 사용한다.
apt-get install -y kubeadm=1.xx.y-00
apt-get install -y kubelet=1.xx.y-00
apt-get install -y kubectl=1.xx.y-00
Configure cgroup driver used by kubelet on control-plane node
Docker외의 CRI를 사용할 경우 사용할 cgruopDriver를 추가로 설정해 주어야한다.
[링크]를 참고하여 설정한다.
Initializing Control-Plane Node (Master Node)
kubeadm init 명령을 통해 Master Node에서 kubeadm을 이용해 Cluster를 init 해 준다. init 시 argument들을 [arguments 설명 문서]을 확인하여, 사용할 Cluster 구성 계획에 맞게 올바르게 설정한다.
- 설치할 CNI Plugin에 따라
--pod-network-cidr을 설정에 제한이 있을 수 있다.--apiserver-advertise-address를 상황에 따라 [설명]을 확인하여 설정한다. 이번 테스트에서는 Master Node의 Private IP를 사용한다.
sudo kubeadm init --pod-network-cidr=10.244.0.0/16 --apiserver-advertise-address=<master-node-ip-address>
- init 성공 확인
제일 아래 출력되는 kubeadm join 명령을 확인 후 저장해 둔다. 이후, Worker Node Join시 사용된다.
# 출력 예시!!!
Your Kubernetes control-plane has initialized successfully!

To start using your cluster, you need to run the following as a regular user:

  mkdir -p $HOME/.kube
  sudo cp -i /etc/kubernetes/admin.conf $HOME/.kube/config
  sudo chown $(id -u):$(id -g) $HOME/.kube/config

You should now deploy a Pod network to the cluster.
Run "kubectl apply -f [podnetwork].yaml" with one of the options listed at:
  /docs/concepts/cluster-administration/addons/

You can now join any number of machines by running the following on each node
as root:

  kubeadm join <control-plane-host>:<control-plane-port> --token <token> --discovery-token-ca-cert-hash sha256:<hash>
- init 완료 후 출력되는 내용을 바탕으로 유저 권한 설정을 수행한다.
mkdir -p $HOME/.kube
sudo cp -i /etc/kubernetes/admin.conf $HOME/.kube/config
sudo chown $(id -u):$(id -g) $HOME/.kube/config
Install CNI on Master Node
사용할 CNI를 각 CNI 문서들을 참고하여 설치한다. CNI 링크 목록
각 CNI 버전별로 지원하는 Kubernetes 버전을 확인하여 설치한다.
- Flannel 설치 예시
kubectl apply -f https://raw.githubusercontent.com/coreos/flannel/master/Documentation/kube-flannel.yml - CNI Pod이 Running Status로 바뀐 것을 확인한다.

Joining Worker Nodes
Cluster에 추가할 Worker Node들에서 kubeadm join을 통해 Cluster에 Worker Node들을 추가해 준다. Master Node Init 성공시 출력된 토큰 정보가 포함된 kubeadm join명령을 사용한다.
- 만약 토큰 정보 재 확인 시,
kubeadm token list를 통해 확인하거나, 재 생성 할 수 있다.
- 토큰 재생성 & join command get
kubeadm token create --print-join-command - 각 Worker Node에서 join을 수행한다.
kubeadm join --token <token> <control-plane-host>:<control-plane-port> --discovery-token-ca-cert-hash sha256:<hash> - Node Join 확인

Cluster Nodes 확인
Master Node에서 정상적으로 Join된 Worker Node들을 확인 할 수 있다. NotReady 상태의 Worker Node들이 잠시 후 Ready 상태로 변화한다. 각 Node들의 Container Runtime, Kubelet Version 등이 확인 가능하다.

Pod Creation Test
테스트할 Pod 생성 Yaml을 작성 후, Pod이 정상 생성 되는지 확인한다.
- Test Pod Yaml
- test-pod.yaml
apiVersion: v1
kind: Pod
metadata:
  name: busybox-sleep
spec:
  containers:
  - name: busybox
    image: busybox
    args:
    - sleep
    - "1000000"
- Pod 생성
kubectl apply -f test-pod.yaml -
생성된 Pod 확인

- Pod 내부 DNS 확인

참고
Remove Master Node Taint
Master Node에 일반 Pod 생성을 원할 경우 taint를 제거해 준다.
kubectl taint nodes --all node-role.kubernetes.io/master-
or
kubectl taint nodes {Target Master Node Name} node-role.kubernetes.io/master-
Source
- https://kubernetes.io/docs/setup/production-environment/tools/kubeadm/install-kubeadm/
- https://kubernetes.io/docs/setup/production-environment/tools/kubeadm/create-cluster-kubeadm/
- https://docs.projectcalico.org/getting-started/kubernetes/quickstart
- https://kubernetes.io/ko/docs/reference/kubectl/cheatsheet/
- https://kubernetes.io/docs/reference/setup-tools/kubeadm/kubeadm-join/

Leave a comment