[React] Redux with React
Redux
공식 홈페이지에서는 Redux를 ‘JavaScript App을 위한 예측 가능한 State Container’로 소개하고 있다. JavaScript App의 규모가 커지고 복잡해 질 수록 많은 State들을 관리하기 어려워 진다. Redux를 사용해 State를 중앙에서 관리하여 이러한 문제점을 해결 할 수 있다.
Basic Terms
State
Redux 저장소에 의해 관리되고, getState()에 의해 반환되는 상태값
Action
상태를 변화시키려는 의도를 표현하는 객체이다. 모든 데이터들은 Action으로 보내지고, 오직 Action을 통해서만 Store에 데이터를 넣을 수 있다. 어떤 액션이 수행 될지를 나타내는 type필드가 필수이며, 이외의 필드는 임의로 사용이 가능하다. (ex) payload 필드: 데이터를 담아 전달)
Reducer (Reducing Function)
이전 상태와 액션을 받아서 다음 상태를 반환하는 순수 함수이다. 이전 상태를 변경할 수 없고, 새로운 상태 객체를 생성해서 반환해야한다.
Dispatch Function
Action을 발생시키는 함수이다. 반드시 동기적으로 저장소의 Reducer에 Action을 보내야한다.
Middleware
dispatch function을 이용해 새로운 dispatch function을 반환한다.
Store
Applicaton의 State Tree를 가지고 있는 객체이다. Redux 앱에는 반드시 하나의 저장소만 있어야한다.
Using Redux with React
React 앱에서 Redux를 사용하기 위한 방법으로 react-redux라는 react용 redux 바인더를 사용할 수 있다.
예제 프로젝트
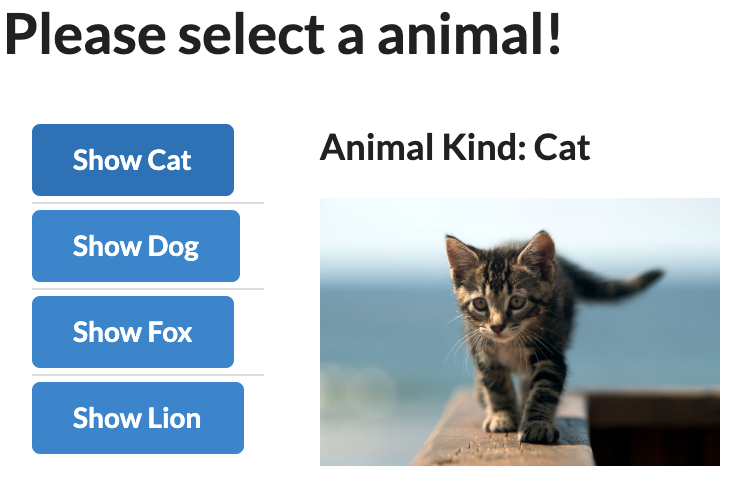
예제에서 사용된 React App Project의 GitHub 링크입니다.

설치 방법
React App 생성 후, redux, react-redux 라이브러리를 설치해 사용할 수 있다.
npm install redux react-redux
Provider
React App에서 Redux store를 사용하도록 하기 위해 App Component를 ‘react-redux’의 ‘Provider’로 감싸준다. Provider에 store를 넣어주게 되는데, ‘redux’의 ‘createStore’를 이용해 store를 생성할 수 있다. createStore에 reducer들을 넣어준다.
- index.js 예시:
import React from "react";
import ReactDOM from "react-dom";
import { Provider } from "react-redux";
import { createStore } from "redux";
import App from "./components/App";
import reducers from "./reducers";

ReactDOM.render(
    <Provider store={createStore(reducers)}>
        <App />
    </Provider>,
    document.querySelector("#root")
);
Action
type을 포함하는 객체를 리턴하는 action을 정의한다. type필드에 어떤 액션이 수행 될지를 나타내며, 나머지 필드는 임의로 사용이 가능하다. 데이터를 전달할 경우 주로 ‘payload’라는 필드명을 사용한다.
- 예시:
export const selectAnimal = (animal) => {
    return {
        type: "ANIMAL_SELECTED",
        payload: animal,
    };
};
Reducer
이전 상태와 액션을 받아서 다음 상태를 반환하는 순수 함수를 작성한다. 이전 상태를 변경할 수 없고, 새로운 상태 객체를 생성해서 반환해야한다. redux의 ‘combineReducers’를 통해 여러 reducer들을 하나로 합칠 수 있다.
- 예시: 아래의 예시는 animal의 정보를 return하는 animalsReducer와 선택된 animal 객체를 return하는 selectedAnimalReducer를 작성 후 combineReducers을 통해 reducer들을 combine해 주었다.
import { combineReducers } from "redux";

const animalsReducer = () => {
    return [
        { kind: "Cat", img: "/images/cat.jpeg" },
        { kind: "Dog", img: "/images/dog.jpeg" },
        { kind: "Fox", img: "/images/fox.jpeg" },
        { kind: "Lion", img: "/images/lion.jpeg" },
    ];
};

const selectedAnimalReducer = (selectedAnimal = null, action) => {
    if (action.type === "ANIMAL_SELECTED") {
        return action.payload;
    }

    return selectedAnimal;
};

export default combineReducers({
    animals: animalsReducer,
    selectedAnimal: selectedAnimalReducer,
});
Using State (with Hooks API)
‘react-redux’의 useSelector()를 사용하여 redux store state로 부터 데이터를 얻어 올 수 있다.
- 예제: 아래와 같이 useSelector()를 사용해 reducer로부터 생산되는 state 데이터들을 사용할 수 있다.
// AnimalDetail.js
import React from "react";
import { useSelector } from "react-redux";

const AnimalDetail = () => {
    const animal = useSelector((state) => state.selectedAnimal);

    if (!animal) {
        return <div>Select a Animal</div>;
    }

    return (
        <div>
            <h3>{`Animal Kind: ${animal.kind}`}</h3>
            <p>
                <img alt={animal.kind} src={animal.img} width="200px" />
            </p>
        </div>
    );
};

export default AnimalDetail;
Using State (with connect())
앞의 예제의 경우 Hooks API를 이용한 방식으로, react-redux에 의해 추천되는 방식이다. Hooks API를 사용하지 않는 기존 방식인 react-redux의 connect()를 사용해 redux store의 state로부터 component의 props를 mapping할 수 있다.
- 예제: connect()의 첫번째 인자로 state data를 props로 매핑하는 정보 전달
// AnimalDetail.js
import React from "react";
import { connect } from "react-redux";

const AnimalDetail = ({ animal }) => {
    if (!animal) {
        return <div>Select a Animal</div>;
    }

    return (
        <div>
            <h3>{`Animal Kind: ${animal.kind}`}</h3>
            <p>
                <img alt={animal.kind} src={animal.img} width='200px'/>
            </p>
        </div>
    );
};

const mapStateToProps = (state) => {
    return { animal: state.selectedAnimal };
};

export default connect(mapStateToProps)(AnimalDetail);
Dispatching Actions (with Hooks API)
‘react-redux’의 useDispatch()를 사용하여 action을 dispatch할 수 있다.
- 예제: 아래와 같이 useDispatch()를 사용한다.
// AnimalList.js
import React from "react";
import { useDispatch, useSelector } from "react-redux";
import { selectAnimal } from "../actions";

export const AnimalList = () => {
    const animals = useSelector((state) => state.animals);
    const dispatch = useDispatch();

    const renderList = () => {
        return animals.map((animal) => {
            return (
                <div className="item" key={animal.kind}>
                    <button
                        className="ui button primary"
                        onClick={() => dispatch(selectAnimal(animal))}
                    >
                        Show {animal.kind}
                    </button>
                </div>
            );
        });
    };

    return <div className="ui divided list">{renderList()}</div>;
};

export default AnimalList;
Dispatching Actions (with connect())
앞의 예제의 경우 Hooks API를 이용한 방식으로, react-redux에 의해 추천되는 방식이다. Hooks API를 사용하지 않는 기존 방식인 react-redux의 connect()를 사용해 component의 props로 dispatch시 사용할 함수를 mapping할 수 있다.
- 예제: connect()의 두번째 인자로 action을 전달해 dispatch 시 사용
// AnimalList.js
import React, { Component } from "react";
import { connect } from "react-redux";
import { selectAnimal } from "../actions";

class AnimalList extends Component {
    renderList() {
        return this.props.animals.map((animal) => {
            return (
                <div className="item" key={animal.kind}>
                    <button
                        className="ui button primary"
                        onClick={() => this.props.selectAnimal(animal)}
                    >
                        Show {animal.kind}
                    </button>
                </div>
            );
        });
    }

    render() {
        return <div className="ui divided list">{this.renderList()}</div>;
    }
}

const mapStateToProps = (state) => {
    return { animals: state.animals };
};

export default connect(mapStateToProps, { selectAnimal })(AnimalList);

Leave a comment