[Spring] Spring IoC Container
IoC
Inversion of Control의 약자이며 제어의 역전으로 해석된다. 사용자가 직접 어플리케이션을 컨트롤 하던 방식에서(의존성이 있는 객체들을 사용자가 스스로 생성, 관리), Spring Container가 객체를 생성하고 관리하는 방식으로 제어의 주체가 바뀌는 것을 의미한다.
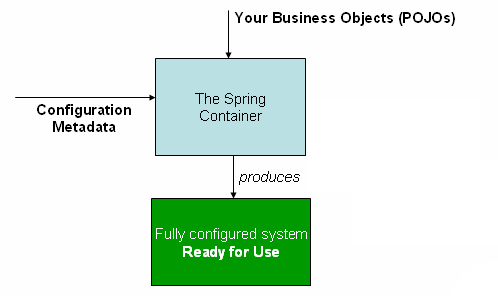
Spring IoC Container가 Configuration Metadata에 따라 객체들을 생성 및 의존성을 관리하고, bean을 생성 할 때 의존성들을 주입해 준다. 객체들의 의존성을 주입해 주기 때문에 Dependency Injection(DI)의 특징을 가진다.

IoC 장점
- 객체 관리를 Container에서 하기 때문에, 사용자가 직접 할 필요가 없다.
- XML configuration metadata 방식을 사용할 경우, 컴파일 없이 의존성을 변경할 수 있다.
Spring IoC container Interface
BeanFactoryInterface 에서 Spring IoC container의 기능을 정의하며, BeanFactory를 상속받는 ApplicationContext에서 BeanFactory의 기능 및 AOP, Message Resource 관리, Event publication 등의 기능을 추가 제공한다.
Configuration Metadata
ApplicationContext 에서 XML, Java Annotation 등과 같은 Configuration Metadata를 사용하여, bean들의 생성 및 관리한다.
XML 기반의 configuration metatdata는 아래와 같은 형태로 표현된다.
<?xml version="1.0" encoding="UTF-8"?>
<beans xmlns="http://www.springframework.org/schema/beans"
    xmlns:xsi="http://www.w3.org/2001/XMLSchema-instance"
    xsi:schemaLocation="http://www.springframework.org/schema/beans
        https://www.springframework.org/schema/beans/spring-beans.xsd">

    <bean id="..." class="...">
        <!-- collaborators and configuration for this bean go here -->
    </bean>

    <bean id="..." class="...">
        <!-- collaborators and configuration for this bean go here -->
    </bean>

    <!-- more bean definitions go here -->

</beans>
services.xml 등의 파일에 configuration metadata가 작성되고 ApplicationContext 객체 생성 시, 이 설정 파일들을 사용한다.
ApplicationContext context = new ClassPathXmlApplicationContext("services.xml", "daos.xml");
Using the Container
ApplicationContext를 이용해 bean들을 가져와 사용할 수 있다.
// create and configure beans
ApplicationContext context = new ClassPathXmlApplicationContext("services.xml", "daos.xml");

// retrieve configured instance
PetStoreService service = context.getBean("petStore", PetStoreService.class);

// use configured instance
List<String> userList = service.getUsernameList();
Bean
Spring IoC 컨테이너는 하나 이상의 bean들을 관리하고 XML에 설정한
BeanDefinition
컨테이너에서 bean들은 BeanDefinition object로 관리되며, 아래의 metadata들을 포함한다.
- A package-qualified class name
- scope, lifecycle callbacks 과 같은 bean configuration elements
- bean 동작을 위한 의존성 있는 bean의 참조 정보
- pool size limit 혹은 connection pool을 관리하는 bean의 connection 수 등의 기타 configuration
Naming Beans
Bean Naming Conventions
- Java의 instance field naming convention을 따른다.
- lowercase의 글자로 시작, 이후부터 camel-case
Bean Name Aliasing
설정을 통해 bean name을 aliasing 할여 사용 할 수 있다.
- name: target bean name을 설정
- alias: target bean의 alias를 지정
<alias name="fromName" alias="toName"/>
Instantiating Beans
기본 bean 정의
<bean id="exampleBean" class="examples.ExampleBean"/>
<bean name="anotherExample" class="examples.ExampleBeanTwo"/>
Factory Method 초기화 bean
factory method를 설정하여, bean 초기화 시, factory method를 통해 인스턴스화 될 수 있도록 한다. factory method → static
<bean id="clientService"
    class="examples.ClientService"
    factory-method="createInstance"/>
// example of class with factory method
public class ClientService {
    private static ClientService clientService = new ClientService();
    private ClientService() {}

    public static ClientService createInstance() {
        return clientService;
    }
}
Factory bean의 Factory Method 초기화 bean
factory bean을 등록한 후, factory bean의 factory method를 사용하여 bean을 초기화 할 수 있다.
<!-- the factory bean, which contains a method called createInstance() -->
<bean id="serviceLocator" class="examples.DefaultServiceLocator">
    <!-- inject any dependencies required by this locator bean -->
</bean>

<!-- the bean to be created via the factory bean -->
<bean id="clientService"
    factory-bean="serviceLocator"
    factory-method="createClientServiceInstance"/>
public class DefaultServiceLocator {

    private static ClientService clientService = new ClientServiceImpl();

    public ClientService createClientServiceInstance() {
        return clientService;
    }
}
Dependencies Injection
Spring Container에서 관리되는 bean들을 객체에 주입해 준다.
constructor-arg 설정을 하지 않을 경우, 클래스에 argument가 없는 기본 생성자가 꼭 필요하다.
Constructor-based Dependency Injection
-
생성자 argument 기본 설정
아래의 예시와 같이 <constructor-arg ref={bean}/>를 통해 생성자 argument를 설정할 수 있다.
  <beans>
      <bean id="beanOne" class="x.y.ThingOne">
          <constructor-arg ref="beanTwo"/>
          <constructor-arg ref="beanThree"/>
      </bean>

      <bean id="beanTwo" class="x.y.ThingTwo"/>

      <bean id="beanThree" class="x.y.ThingThree"/>
  </beans>
package x.y; public class ThingOne { public ThingOne(ThingTwo thingTwo, ThingThree thingThree) { // ... } } -
생성자 argument type or index matching 기능
아래의 예시와 같이 type을 설정하거나, argument의 index(순서)를 0부터 설정하여 생성자 argument를 지정 할 수 있다.
  <bean id="exampleBeanWithType" class="examples.ExampleBean">
      <constructor-arg type="int" value="7500000"/>
      <constructor-arg type="java.lang.String" value="42"/>
  </bean>

  <bean id="exampleBeanWithIndex" class="examples.ExampleBean">
      <constructor-arg type="int" value="7500000"/>
      <constructor-arg type="java.lang.String" value="42"/>
  </bean>
package examples; public class ExampleBean { // Number of years to calculate the Ultimate Answer private int years; // The Answer to Life, the Universe, and Everything private String ultimateAnswer; public ExampleBean(int years, String ultimateAnswer) { this.years = years; this.ultimateAnswer = ultimateAnswer; } } -
생성자 argument name 이름 지정 기능
아래의 예시와 같이 @ConstructorProperties를 통해 지정된 이름의 생성자 argument argument name을 사용하여 생성자의 argument를 설정할 수 있다.
  <bean id="exampleBean" class="examples.ExampleBean">
      <constructor-arg name="years" value="7500000"/>
      <constructor-arg name="ultimateAnswer" value="42"/>
  </bean>
package examples; public class ExampleBean { // Fields omitted @ConstructorProperties({"years", "ultimateAnswer"}) public ExampleBean(int years, String ultimateAnswer) { this.years = years; this.ultimateAnswer = ultimateAnswer; } }
Setter-based dependency injection
기본 생성자(with no-argument)나 static factory method가 호출 된 후, setter method들을 사용하여 dependency injection할 수 있다. 아래의 예시처럼, dependency를 설정하는 setter method를 이용하는 방법이지만, dependency가 null로 설정 될 수 있는 등의 문제가 있다.
<bean id="exampleBean" class="examples.ExampleBean">
    <!-- setter injection using the nested ref element -->
    <property name="beanOne">
        <ref bean="anotherExampleBean"/>
    </property>

    <!-- setter injection using the neater ref attribute -->
    <property name="beanTwo" ref="yetAnotherBean"/>
    <property name="integerProperty" value="1"/>
</bean>

<bean id="anotherExampleBean" class="examples.AnotherBean"/>
<bean id="yetAnotherBean" class="examples.YetAnotherBean"/>
public class ExampleBean {

    private AnotherBean beanOne;

    private YetAnotherBean beanTwo;

    private int i;

    public void setBeanOne(AnotherBean beanOne) {
        this.beanOne = beanOne;
    }

    public void setBeanTwo(YetAnotherBean beanTwo) {
        this.beanTwo = beanTwo;
    }

    public void setIntegerProperty(int i) {
        this.i = i;
    }
}
Bean Scopes
Bean에는 다양한 Scope이 존재하여, 새로운 object instance 생성 및 사용의 범위를 설정할 수 있다.
Singleton Scope
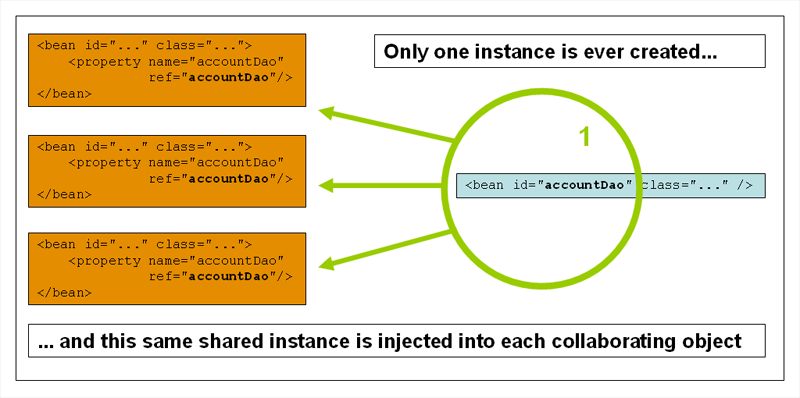
Default Scope이고, Spring IoC Container에 bean 정의에 의해 하나의 object instance만 생성 되고, 이 instance가 다른 bean들에서 공유된다.

// xml example
<bean id="accountService" class="com.something.DefaultAccountService" scope="singleton"/>
Prototype Scope
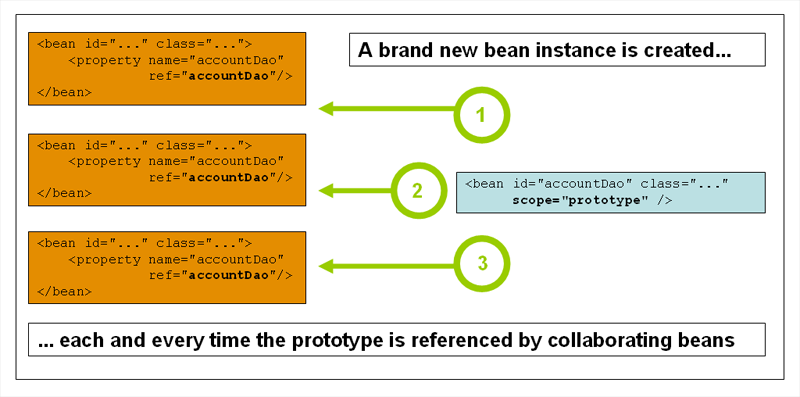
bean이 주입되거나 getBean() 등의 사용 요청 시마다 새로운 bean 인스턴스가 생성되며, instance의 lifecycle이 관리 되지 않으므로 자원 사용에 주의해야한다. bean이 statefule한 경우 사용한다.

// xml example
<bean id="accountService" class="com.something.DefaultAccountService" scope="prototype"/>
Request Scope
하나의 HTTP request당 하나의 bean instance가 생성된다. (XmlWebApplicationContext과 같은 web-aware Spring ApplicationContext implementation을 사용할 때만 사용 가능)
// xml example
<bean id="loginAction" class="com.something.LoginAction" scope="request"/>
Session Scope
하나의 HTTP Session 당 하나의 bean instance가 생성된다. (XmlWebApplicationContext과 같은 web-aware Spring ApplicationContext implementation을 사용할 때만 사용 가능)
// xml example
<bean id="userPreferences" class="com.something.UserPreferences" scope="session"/>
Application Scope
하나의 ServletContext당 하나의 bean instance가 생성된다. (XmlWebApplicationContext과 같은 web-aware Spring ApplicationContext implementation을 사용할 때만 사용 가능)
// xml example
<bean id="appPreferences" class="com.something.AppPreferences" scope="application"/>
WebSocket Scopte
하나의 WebSocket당 하나의 bean instance가 생성된다. (XmlWebApplicationContext과 같은 web-aware Spring ApplicationContext implementation을 사용할 때만 사용 가능)
Bean Customizing
Lifecycle Callbacks
Initialization Callbacks
org.springframework.beans.factory.InitializingBean interface를 구현하여 bean의 property들이 설정된 후, callback 메소드가 호출 되도록 할 수 있다.. void afterPropertiesSet() throws Exception; 메소드를 하나 구현한다. 이 방법은 spring의존적이라서, @PostConstruct annotation을 사용하는 방식이 추천된다.
<bean id="exampleInitBean" class="examples.AnotherExampleBean"/>
public class AnotherExampleBean implements InitializingBean {

    @Override
    public void afterPropertiesSet() {
        // do some initialization work
    }
}
XML에서는 아래와 같이 bean에 init-method attribute을 설정하여 initialization 함수 설정을 할 수 있다.
<bean id="exampleInitBean" class="examples.ExampleBean" init-method="init"/>
public class ExampleBean {

    public void init() {
        // do some initialization work
    }
}
Destruction Callbacks
org.springframework.beans.factory.DisposableBean interface를 구현하여 bean이 파괴 될 때 불릴 callback 함수를 설정할 수 있다.. void destroy() throws Exception; 메소드를 하나 구현한다. 이 방법은 spring의존적이라서, @PreDestroy annotation을 사용하는 방식이 추천된다.
<bean id="exampleInitBean" class="examples.AnotherExampleBean"/>
public class AnotherExampleBean implements DisposableBean {

    @Override
    public void destroy() {
        // do some destruction work (like releasing pooled connections)
    }
}
XML에서는 아래와 같이 bean에 desctroy-method attribute을 설정하여 destruction함수 설정을 할 수 있다.
<bean id="exampleInitBean" class="examples.ExampleBean" destroy-method="cleanup"/>
public class ExampleBean {

    public void cleanup() {
        // do some destruction work (like releasing pooled connections)
    }
}
Default Initialization and Destroy Methods
xml의 bean들을 init(), destroy() 등의 이름의 메소드들이 bean 초기화 또는 제거 시 불리도록 설정 할 수 있다.
아래와 같이 init() 함수를 준비 한 후,
public class DefaultBlogService implements BlogService {

    private BlogDao blogDao;

    public void setBlogDao(BlogDao blogDao) {
        this.blogDao = blogDao;
    }

    // this is (unsurprisingly) the initialization callback method
    public void init() {
        if (this.blogDao == null) {
            throw new IllegalStateException("The [blogDao] property must be set.");
        }
    }
}
아래의 xml에 default-init-method 혹은 default-destroy-method attribute이 설정된 bean 으로 감싸 준다. 해당 bean 설정 내부의 bean들은 자동으로 default-init-method, default-destroy-method attribute에 설정된 메소드가 호출된다.
<beans default-init-method="init">

    <bean id="blogService" class="com.something.DefaultBlogService">
        <property name="blogDao" ref="blogDao" />
    </bean>

</beans>
Bean Definition Inheritance
bean 설정 시, 상속할 부모 bean을 설정할 수 있다. 부모의 scope, 생성자 argument 값, property값, method override 정보를 상속하거나, override할 수 있다.
XML을 사용할 경우 아래와 같이 child bean에 parent attribute을 이용하여 설정한다. 부모 bean에 abstract attribute을 이용해 명시적으로 설정할 수 있다.
<bean id="inheritedTestBean" abstract="true"
        class="org.springframework.beans.TestBean">
    <property name="name" value="parent"/>
    <property name="age" value="1"/>
</bean>

<bean id="inheritsWithDifferentClass"
        class="org.springframework.beans.DerivedTestBean"
        parent="inheritedTestBean" init-method="initialize">
    <property name="name" value="override"/>
    <!-- the age property value of 1 will be inherited from parent -->
</bean>
아래와 같이 bean에 class를 명시하지 않고, abstract bean으로 사용할 수도 있다. 이 경우 abstract attribute이 꼭 필요하고, abstract bean 자체로는 사용할 수 없다.
<bean id="inheritedTestBeanWithoutClass" abstract="true">
    <property name="name" value="parent"/>
    <property name="age" value="1"/>
</bean>

<bean id="inheritsWithClass" class="org.springframework.beans.DerivedTestBean"
        parent="inheritedTestBeanWithoutClass" init-method="initialize">
    <property name="name" value="override"/>
    <!-- age will inherit the value of 1 from the parent bean definition-->
</bean>
Annotation-based Container Configuration
XML의 Configuration 대신, class에 annotation을 추가 하여 Configuration을 설정할 수 있다. Annotation injection은 XML injection 이전에 수행되기 때문에, XML Configuration이 설정을 덮어 쓸 수 있어서 주의해야한다.
단점: Annotation을 사용할 경우 다시 Compile 해야하고, 설정이 분산되어 있기 때문에 관리가 어려워 질 수 있다.
아래와 같이 XML에서 annotation config 사용을 설정해 준다.
<?xml version="1.0" encoding="UTF-8"?>
<beans xmlns="http://www.springframework.org/schema/beans"
    xmlns:xsi="http://www.w3.org/2001/XMLSchema-instance"
    xmlns:context="http://www.springframework.org/schema/context"
    xsi:schemaLocation="http://www.springframework.org/schema/beans
        https://www.springframework.org/schema/beans/spring-beans.xsd
        http://www.springframework.org/schema/context
        https://www.springframework.org/schema/context/spring-context.xsd">

    <context:annotation-config/>

</beans>
@Required
bean property setter method를 설정한다. Spring Framework 5.1부터는 deprecated 되어, constructor를 통한 injection을 이용하는 것이 좋다.
public class SimpleMovieLister {

    private MovieFinder movieFinder;

    @Required
    public void setMovieFinder(MovieFinder movieFinder) {
        this.movieFinder = movieFinder;
    }

    // ...
}
@Autowired
생성자, setter method, method, field 에 @Autowired를 사용해 dependency 주입을 받을 수 있고, @Autowired 를 이용해 ApplicationContext, BeanFactory 등도 자동으로 주입받아 사용할 수 있다.
JSR 330의
@Injectannotation을 대신 사용 가능하다.
// for constructor, field
public class MovieRecommender {

    private final CustomerPreferenceDao customerPreferenceDao;

    @Autowired
    private MovieCatalog movieCatalog;

    @Autowired
    public MovieRecommender(CustomerPreferenceDao customerPreferenceDao) {
        this.customerPreferenceDao = customerPreferenceDao;
    }

    // ...
}
public class MovieRecommender {

    @Autowired
    private ApplicationContext context;

    public MovieRecommender() {
    }

    // ...
}
@Primary
같은 타입을 리턴하는 bean을 여러개 등록 하여 사용 할 때, 우선순위를 지정하는 경우 사용된다. 아래의 예시에서 MovieCatalog 주입에 @Primary가 설정된 firstMovieCatalog bean이 사용된다.
@Configuration
public class MovieConfiguration {

    @Bean
    @Primary
    public MovieCatalog firstMovieCatalog() { ... }

    @Bean
    public MovieCatalog secondMovieCatalog() { ... }

    // ...
}

public class MovieRecommender {

    @Autowired
    private MovieCatalog movieCatalog;

    // ...
}
@Resource
JSR-250에 정의된 annotation으로, field나 bean property setter method에 사용하여, 필요한 resource를 자동으로 주입할 때 사용된다.
public class SimpleMovieLister {

    private MovieFinder movieFinder;

    @Resource(name="myMovieFinder") // if with no name, it takes field name: movieFinder
    public void setMovieFinder(MovieFinder movieFinder) {
        this.movieFinder = movieFinder;
    }
}
@Value
외부 property들을 주입받을 때 사용한다.
AppConfig에 @PropertySource("classpath:application.properties") 를 설정하여 source를 지정하고
@Configuration
@PropertySource("classpath:application.properties")
public class AppConfig { }
source(application.properties 파일)에 value를 지정하면,
// application.properties example
catalog.name=MovieCatalog
아래와 같이 @Value(“${catalog.name}”) 설정을 통해, 값을 주입받을 수 있다.
@Component
public class MovieRecommender {

    private final String catalog;

    public MovieRecommender(@Value("${catalog.name}") String catalog) {
        this.catalog = catalog;
    }
}
@PostConstruct and @PreDestroy
@PostConstruct, @PreDestroy annoatioin을 이용해 initialization, destruction callback 메소드를 지정할 수 있다.
public class CachingMovieLister {

    @PostConstruct
    public void populateMovieCache() {
        // populates the movie cache upon initialization...
    }

    @PreDestroy
    public void clearMovieCache() {
        // clears the movie cache upon destruction...
    }
}
@Bean
@Configuration, @Bean을 사용해 원하는 객체를 리턴하는 method를 등록하여 bean을 사용 할 수 있다.
@Configuration
public class AppConfig {

    @Bean
    public MyService myService() {
        return new MyServiceImpl();
    }
}
@Component
사용자가 만든 class에 @Component 를 추가하여, Container에서 자동으로 Bean으로 등록되도록 할 수 있다. 이를 위해 component를 스캔할 base-package 설정을 XML에 추가한다.
- <context:component-scan> 추가 시 <context:annotation-config>기능이 자동으로 설정된다.
<?xml version="1.0" encoding="UTF-8"?>
<beans xmlns="http://www.springframework.org/schema/beans"
    xmlns:xsi="http://www.w3.org/2001/XMLSchema-instance"
    xmlns:context="http://www.springframework.org/schema/context"
    xsi:schemaLocation="http://www.springframework.org/schema/beans
        https://www.springframework.org/schema/beans/spring-beans.xsd
        http://www.springframework.org/schema/context
        https://www.springframework.org/schema/context/spring-context.xsd">

    <context:component-scan base-package="org.example"/>

</beans>
JSR-330 Standard Annotations
JSR-330에 정의된 @Inject, @Named, @ManagedBean, @Singleton, @Qualifier 등으로 Spring의 @Autowired, @Component 등을 대체 할 수 있다.

Leave a comment